Showing posts with label bead. Show all posts

Saturday, June 25, 2011

New Beading Books

I have been unusually quiet online lately.  This is mostly due to the large amount of writing I've been doing in the real world.  In the last few months I've put the finishing touches on three beading books.  Teaming with our amazing Bead World staff, we've released a trio of fun instructional books.  These beauties have everything you've come to love in Bead World books -- lots of helpful pictures, step by step instructions and great project ideas!

  • Seed Bead Basics: the Bead World Way!, by Lezli Goodwin with Mary Brown, Bailey DeGraff, Robynne Hughes, Nancy Katz and Kim Lucas, $12.99  This great seed bead primer has all the info you need to get started with simple seed bead projects.  Learn how to tie off threads, add new threads, connect various kinds of clasps and more!  Patterns include:
    • DNA Spiral Bracelet
    • Flower Garden (Fringe) Bracelet
    • Sidewinder Bracelet
    • Double Sidewinder Bracelet
    • Peyote Stitch Bracelet
    • Right Angle Weave Bracelet

    
    Pictured: Right Angle Weave Bracelet
    
  • Beyond Basics: All Tied Up! by Lezli Goodwin with Mary Brown, Breanne Determan, Robynne Hughes, Sara Martin, Kate Stanley and Karen Thompson, $12.99  Take your beading to the next level with fun twists on traditional textile techniques!  Utilize crochet, macrame and kumihimo to create hip, modern jewelry you'll love!  Patterns include:
    • Beaded Hemp Bracelet
    • Macrame Bracelet with Slide Clasp
    • 3 Strand Wire Crochet Necklace
    • Twisted Crochet Necklace
    • Crocheted Cuff Bracelet
    • Kumihimo Necklace
    • Beaded Kumihimo
Pictured: Macrame Bracelet with Slide Clasp
                                   
  • Chain Maille for Beginners, by Lezli Goodwin with Mary Brown, Judy Corning, Robynne Hughes and Lisa Kearn, $12.99  Everything you need to know to get started with basic chain maille, including how to choose the right rings for the project, closing jump rings properly and some beautiful classic designs.  Patterns include:
    • Cha Cha Bracelet with Borosilicate Glass Beads
    • 2 in 2 Bracelet
    • 2 in 1 Earrings
    • Copper Flower Earrings
    • Fleurette Earrings
    • Spiral Bracelet


Pictured: Copper Flower Earrings, Fleurette Earrings and 2 in 1 Earrings


Thursday, February 24, 2011

New Downloadable Projects!

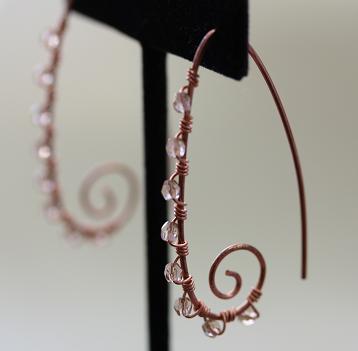
Okay, I'll admit that I'm a bit odd.  I really enjoy writing jewelry instructions.  I especially enjoy writing jewelry instructions with big color photographs that are clear and easy to follow.  So imagine my excitement every time I get to post new FREE downloadable jewelry instructions to our website.  (It's a good thing I found a job at a bead store -- I can't imagine getting this worked up over insurance claims!)  I've added two new earring patterns just this week, including the Wire Wrapped Scroll Earrings (pictured at left).  Just scroll down to the bottom of the Downloadable Projects page to find our newest additions!  Happy Beading!

Friday, November 19, 2010

Christmas Kits are Back!

It's that time of year again!  Christmas kits are available at your local Bead World this holiday season!  We try to make your holiday gift giving easy, with thirteen adorable and exclusive kits.  Each kit includes everything you need to make a special holiday project, with complete instructions and a color photo of the finished piece.  Can it get any easier than that?!   Every kit uses premium materials (Swarovski crystal, sterling silver, 14K gold filled, copper and more), so your loved ones get the very best.

Toy Soldier Earrings, $9.99


Christmas Lights Earrings, $5.99


Christmas Present Earrings, $10.99


Swarovski Crystal AB Christmas Trees, $8.99

Tuesday, September 7, 2010

Congratulations to the Beading Contest Winners!


Behold, the winner of our first ever beading contest at Bead World!  Karen Kissel of Glendale submitted this adorable earring and bracelet set which fit our theme Summer Love perfectly.  Every element of this bracelet is created by hand, from the torch fused fine silver chain to the Precious Metal Clay charms and wire wrapped bead elements.  Here's what Karen had to say about her piece:

"I created this Summer Love dangle bracelet and earring set using pure silver charms and Swarovski crystal beads. The charms are PMC molded in the shapes of the ocean and the beautiful blue crystals have the bright and shimmering feel of summer at the beach. The bracelet was assembled using the fine silver rings we fused and hammered in class, and I used the wire wrap technique you taught me to design the dangles for both the bracelet and earrings."


FIRST RUNNER UP: $10.00 in Bead Bucks
Rose Balazs of Scottsdale, Arizona

"Summertime can be equated with fun times and greens -- the sun shining through the green trees, green grass and lots of green shrubbery." This piece was made using intricate stitching and gorgeous Czech glass firepolish beads.  I've seen this piece in person, and it's even more beautiful in real life!  Delicate craftsmanship like this really inspires me to get out the tiny beads and expand my skills.


HONORABLE MENTIONS:

Best Wire Working: Lora Klosterboer


Most Innovative Use of Materials: Pam Harris


Best Jewelry Photography: Linda Seward


Thursday, July 29, 2010

Reverse Those Colors for a Fresh New Look!

Selecting colors can be one of the hardest tasks for a new jewelry designer. Try as we might, you guys never quite believe us when we say, "There is no wrong answer!" Truly, the best reason to learn the basics of color theory is to learn your favorite ways to break them. Once you do find a favorite color combination, here's a neat trick to keep you out of the dreaded rut -- whatever your instinct tells you to do, reverse the colors! It gives your pieces a fresh, exciting look and allows you to execute twice as many projects in your most beloved color scheme! Good friend and longtime client Fran Gilcrest-Piper loaned me two of her Sidewinder bracelets to help illustrate the concept. Fran used topaz seed beads and jet Swarovski crystals in the example at left, while she chose jet seed beads and topaz Swarovski crystals for the bracelet on the right.


Light interacts with different kinds of beads differently, and color placement can effect the look as well. These two pieces look very different, but use two of Frans favorite neutral colors in a rich, sophisticated way. Beautiful work, Fran!

Saturday, June 12, 2010

Have You Checked Out Beaducation.com?

I'm the first person to spread the word about my favorite places, and let me just tell you:  If you haven't been to http://www.beaducation.com/ yet, you are missing out!  Lisa Niven Kelly's fun, interactive site offers the innovative beader lots of opportunities.  Free video lessons, project ideas and custom products compliment the host of online beading classes.  Lisa's exuberant designs are liberally represented, but she's brought in a whole team of fantastic designers to teach along side her.  Seriously, check it out!


Gorgeous inspiration on their blog!


Classes and instructions you can't find anywhere else!


Metal stamping in an avant garde way!

Tuesday, June 8, 2010

My Best Necklace Ever

Every beader has an example of the one time they just hit it out of the park.  You know, that certain design that everyone comments on and wants to steal.  I made a necklace about six years ago that is still my all time favorite piece.  I was inspired by a picture in a magazine, purchased some gorgeous chalcedony rondelles and whipped it up one summer afternoon.  Never did I suspect that I would spend the next six years explaining that 1) it wasn't difficult to make and 2) I wouldn't mind if they copied it.

It's actually a really easy piece, you see. Just select approximately 4.5 feet of any oval link chain.  (Mine is sterling silver, nicely aged by throwing it on the bathroom counter and leaving it there for weeks, repeatedly.)  Cut it into a whole bunch of 5 link pieces, or whatever length you prefer.  (Really, it doesn't particularly matter.  My piece took 36 sections, plus 2 pieces of about 3 inches of chain for the back.  You'll need to adjust for the size of the chain you select.)  Pick out some gorgeous rondelles, somewhere between 6 and 10mm.  (Mine are 8mm chalcedony, but faceted Czech glass, Swarovski crystal and pearls have also worked out nicely.) 

Now for the fun part! 
  1. Using 22 gauge wire that matches your chain, cut 18 pieces that are 3 inches long. 
  2. Form a wire wrapped loop on one end of a piece of wire.  Add the end link of TWO of the pieces of chain BEFORE you wrap the loop closed.  Both chains should dangle freely.  Now, wrap that loop closed.  Cut off any extra wire.
  3. String on one of your beautiful rondelles, then form another loop.  Once again, string on TWO of the chain pieces, and then wrap the loop closed.  You've now formed a chain unit. 
  4. Continue in this manner until you have built a 12 inch section with open chain on each end.  Then repeat to build a second twelve inch section.  Lay the chains together and align the ends.
  5. Form a wire wrapped loop on one end of a piece of wire. Add the end links of ALL FOUR of the end pieces of one side of the necklace BEFORE you wrap the loop closed. This will permanently attach the two sections together. Now, wrap that loop closed. Cut off any extra wire.
  6. String on one of your beautiful rondelles, then form another loop. This time, string on the end of one of the 3 inch chain pieces for the back, and then wrap the loop closed.
  7. Repeat this process on the other side of the necklace.  Add the clasp of your choice and Voila!

Tuesday, May 18, 2010

Teri's Knotted Pearl Necklace

Teri’s Knotted Pearl Necklace


Teri’s Knotted Pearl Necklace is a stylish twist on a timeless classic. Everybody loves hand knotted pearls. Teri gives us a great way to freshen them up using sassy colored pearls and fun Vintaj charms.

Necessary Skills:
Cord Knotting
Using clamshells
Jump rings


You Will Need:
3 pieces of brass chain (1/4 inch, ½ inch and ¾ inch)
Size 5 Griffin pearl knotting silk (2 meters)
8mm teal freshwater pearls (1 strand)
Vintaj charm, sunflower charm and teeny lizard charms
5mm Vintaj jump rings (4)
7mm Vintaj jump ring
Size 11 seed beads OR 2mm Swarovski crystals
Clamshells (2)
Trigger clasp
Awl or knotting tweezers

Instructions:

1. Tie a knot in the end of the knotting silk opposite the needle. Thread the needle through the hole in the hinge of one clamshell. Pull the silk all the way through, so the knot sits in the cup of the clamshell. Tie a knot and press it against the outside of the clamshell, using your awl or tweezers.

2. Leave a ¾ inch space. Tie another knot and pull it tight. String on one seed bead, one pearl and another seed bead. Tie a knot and press it against the seed bead, using your awl or tweezers.

3. Repeat this technique until you reach the desired length. Be careful to use an even number of pearls! (Teri’s is 18 inches long.) Add the second clamshell and carefully knot inside the cup. Apply superglue to both knots, trim the silk and press both clamshells closed.

4. Open the loop on one clamshell, string on the trigger clasp and curl the loop closed.

5. Open the loop on the second clamshell, string on the 7mm jump ring and curl the loop closed. You now have a functional necklace!

6. Carefully open one 5mm jump ring. String on the end link of all three pieces of brass chain and the silk in the center open space. Carefully close the jump ring.

7. Carefully open one 5mm jump ring. String on the other end of the longest piece of chain as well as the loop at the top of the butterfly charm. Carefully close the jump ring.

8. Carefully open one 5mm jump ring. String on the other end of the medium piece of chain as well as the loop at the top of the sunflower charm. Carefully close the jump ring.

9. Carefully open the last 5mm jump ring. String on the other end of the shortest piece of chain as well as the loop at the top of the teeny lizard charm. Carefully close the jump ring. Your necklace is finished!

Thursday, May 13, 2010

Our Crystal Link Necklace Kit

One of the most fun things about working for a bead store is the opportunity to design beading kits.  After all, sometimes clients just want to grab a quick project that they know will turn out beautifully!  As professional beaders (what a thrilling thing to call ourselves!) we understand the desire for fresh, interesting designs -- not to mention the ease of having all of the required elements pre-assembled.  Of course, as beading teachers, we try to make sure everyone has ample opportunity to practice their new beading skills! 

Sometimes, the perfect seasonal necklace is less about over-the-top design and more about assembling basic elements into a sleek, wearable pendant.  Our new Crystal Link Necklace (featuring stunning quartz crystal and hammered TierraCast links) is just such a piece.  Who knew two links and one bead could become such a lovely counterpoint to a fun summer dress?  In this case, simplicity reigns supreme.

Friday, May 7, 2010

How to Become a Wholesale Client

One of the questions I get most often is, "How do I get my wholesale license?"  In the state of Arizona, you will need to obtain a state Transaction Privilege Tax (TPT) License.  You can accomplish this task online at the Arizona Department of Commerce web site.   You are often also required to have a license from the city in which your business is located.  The state TPT license, however, is the one you need to qualify as a wholesale company.  Once you obtain your state TPT license, here's how you register as a wholesale client at Bead World: bring us a photocopy of your state TPT license and fill out a short worksheet.  That's it!  Once this is done, you qualify for a 20% discount off almost everything in the store and you are sales tax exempt for all resellable jewelry items.

Starting a jewelry business and getting your wholesale license has a lot of great advantages:
  • earn extra money doing something you love
  • gain entrance into "wholesale only" gem shows
  • obtain discounts at many bead stores, including Bead World
  • be permitted to order from "wholesale only" web sites or purchase at different prices
  • write off expenses at tax time
Of course, there are responsibilities that come with running a beading business, too. In addition to the job of making and selling jewelry, you will also have to handle the business aspects:
  • sending monthly sales tax reports to your city and state
  • filing income taxes annually as a small business
  • keeping track of all of your expenses for tax purposes
Most wholesale clients find that the duties and responsibilities are quite small compared to the benefits of maintaining their wholesale TPT license.

Thursday, April 29, 2010

Vintaj Arte Metal

Just when we thought Vintaj couldn't get any better, they've launched a new line - Arte Metal!  Designed to coordinate with gunmetal and blackened silver, Arte Metal features a rich, black patina.  We are so excited to offer a selection of Arte Metal stamping blanks, ribbon slides and pendants.  Let us know what you think!

Marcasite Butterfly, Vintaj Arte Metal, $2.65 at Bead World


Compass Ribbon Slide, Vintaj Arte Metal, $3.45 at Bead World


Waterlily Ribbon Slide, Vintaj Arte Metal, $3.45 at Bead World

Friday, April 23, 2010

Bird Charms Take Flight!

Wow, kids!  Bird charms are so darn popular lately!  And it's no wonder, with all the super adorable bird charms available right now.  We've added quite a few fabulous feathered friends to our sterling silver charm boxes this week.  From swallows to hummingbirds all the way to the wise old owl, our range of bird charms is now top notch. Here is a quick preview of some of our newest...


Peace Dove, $6.00 at Bead World

Asian Bird Cage charm, $10.95 at Bead World


Disc with Bird Cut-Out, $10.95 at Bead World


Bird on a Perch, $7.20 at Bead World


Owl Pendant, $14.25 at Bead World


Hummingbird, $7.80 at Bead World

Thursday, April 1, 2010

2010 Spring/Summer Jewelry Trends

Hot off the fashion presses, we have news about the Spring/Summer 2010 Jewelry Trends!  It's going to be a fun one, folks!  The powers that be are a little schizophrenic this year, showing super bright tropical colors in half of the runway shows and sleek neutrals in the others.  What's a girl to do?  I say pick your favorites from the colors at left and roll with it!  (Coral and turquoise, by the way, look gorgeous on everyone.)

Jewelry this spring and summer is all about BIG, bold shapes.  We're seeing the return of the big earring (yea!) and keeping last season's statement necklaces and stacked, chunky bracelets as well.  Choose ONE large piece per outfit, please.  Any more than that may just overwhelm you.  Actress Kate Hudson works this look perfectly here, with shoulder dusting chain earrings and no necklace at all.  No matchy-matchy if you want to look up to date this season!


Rock star looks are holding strong, too.  Returning with a vengence is, my all-time favorite, silver chain!  Layered, messy, knotted, mixed with other metals... any way you can pile that silver chain in there will work this season.  Other rock and roll elements are looking fresh this year as well: leather, studs, crystal.  Just keep it a little bit rough, and you're good to go.


One hot new trend that I KNOW you will all love is funky ethnic inspired pieces.  Mix together some wood, rough cut gemstones and African trade beads.   Maybe throw in some fabric elements or leather.  Keep the overall design big and a little bit random.  Voila!  Your own personal masterpiece!

Have fun, guys.  Use up all of your left over beads and bits of chain in super fun, messy masterpieces.  And send me pictures!  Lots and lots of pictures!  I'll post them and give you guys credit.

Happy creating!

Saturday, March 27, 2010

How to Make a Rosary

In honor of Easter, we're posting our Traditional Rosary instructions!  This is a classic Catholic prayer bead pattern that has been popular for hundreds of years.  Every Easter, Catholic beaders make literally millions of rosaries, which are then used in religious services and in prayer throughout the year.  From a beading perspective, a wire wrapped rosary is ideal for practicing your wire wrapping skills.  If you're not Catholic, you can give one as a treasured gift to a friend, or to a child at First Communion.  (As an alternative pattern, you can wire wrap 108 beads for a Buddhist prayer mala.)  You can find this Traditional Rosary pattern, as well as lots of other free downloadable projects, on our web site http://www.beadworldinc.com/

Materials needed:


53 beads for “Hail Mary” (A Bead)
6 beads for “Our Father” (B Bead)
1 crucifix
1 three loop connector or Rosary center
14 short lengths of chain (approx. ½ inch long)
24 gauge wire for wrapping, cut into 59 3 inch pieces
4 jump rings, 5mm 19 gauge


Traditional Rosary Instructions:
1. Using the 24 gauge wire, make a long wire wrapped strand following this pattern: chain, 10 of the A beads, chain, one B bead, chain, 10 of the A beads, chain, one B bead, chain, 10 of the A beads, chain, one B bead, chain, 10 of the A beads, chain, one B bead, chain, 10 of the A beads, chain. Each bead is its own wire wrapped unit, so you’re looking at 118 wire wrapped loops altogether in this project! It’s great wire wrapping practice!
2. Using jump rings, connect each end of the strand to the three loop connector.

3. Using the 24 gauge wire, make a short wire wrapped strand following this pattern: chain, one B bead, chain, 3 of the A beads, chain, one B bead, chain.

4. Using jump rings, connect one end of the short strand to the bottom loop of the three loop connector. Connect the other end to the crucifix.

Thursday, March 25, 2010

Spring Dragonfly Earrings

Spring has sprung, the weather is beautiful and I am wearing a tank top!  This time of the year, I am always so grateful to live in the glorious Valley of the Sun.  While most of my friends are still shoveling snow out of their driveways, I'm watching hummingbirds hover over my blossoming honeysuckle.  This cute (and easy!) pair of earrings really reflect my sassy, springy mood.  Our dragonfly is made out of Swarovski crystal in sapphire, but you can use any color you prefer. 

Dragonfly Earrings:
Required Skills: Wire Wrapping
You will need:

• 2 4mm Swarovski Crystal bicones
• 6 5mm Swarovski Crystal bicones
• 2 5mm Swarovski Crystal rounds
• 2 TierraCast silver plated dragonfly wings
• 6 sterling silver daisy spacers
• 2 3 inch sterling silver headpins
• 2 sterling silver ear wires

Instructions:
• Stack beads onto a headpin in the following order: 4mm bicone crystal, daisy spacer, 5mm bicone crystal, daisy, 5mm bicone crystal, daisy, 5mm bicone crystal, wings, 5mm round crystal.

• Make a wire wrapped loop above the beads and wrap it closed.

• Bend the headpin gently to create a curve.

• Open the ring at the bottom of the ear wire and string the wire wrapped loop. Close the ring.

• Repeat all steps for the other earring.

Monday, March 22, 2010

Vintaj Fabulousness

Three really cool chicks.  I mean, the kind of chicks you'd just want to snatch up, carry around in your pocket and keep forever.  Those are the kind of women that are behind Vintaj natural brass beading components.  Sisters Wendy and Jeanne, along with their dear friend Jess, started the Vintaj company to bring innovative, vintage inspired beading items into the marketplace.  These hip mamas wanted to work for themselves, so they could have a flexible work environment and keep their focus on their children.  Plus, they figured that we would want all of this gorgeous stuff to play with.  They were right!

An instant favorite of beaders everywhere, Vintaj items have been repeatedly featured in every major beading magazine.  What's not to love?  Unlimited creative options, gorgeous hand rubbed patinas, pieces that work together in a variety of ways, "alternative" setting techniques (yes, a dragofly wing is a perfectly reasonable prong!) -- all created using an eco-friendly, lead free process that's healthy for both the earth and your children.  (Yes, they are going to put that in their mouth!) 

At Bead World, we are unabashed lovers of the entire Vintaj line, and we carry a lot of it in our stores.  Just look at the gorgeous things you can make with their unique pieces!  (Yes, I gush.)  We "borrowed" these great design ideas from the official Vintaj Co. website -- there are a million more where these came from.  Check out their blog, too.  It's always full of great ideas.  I want to hear all about how much you guys love this stuff.  Send me pics of your projects, and I'll add them to the blog!

Thursday, March 18, 2010

Leaf Chains Hit the Big Time!

If you've been reading this blog for awhile, you might remember a post I wrote back on February 19th about my love for leaf chains.  (Click here to take a peek at that blog.)  It's easy to use, cost effective and very stylish.  Apparently, I'm not the only one who feels that way.  Alert reader (and good friend) Lyn Gottlieb recently brought a hot jewelry line to my attention after noticing their heavy use of our own favorite chain! 

Buddha Soul jewelry has been featured in InStyle Magazine, and is a favorite of starlets of every variety.  Sarah Jessica Parker even wore it on the cover of InStyle!  New mom and supermodel Gisele Bundchen has been photographed wearing several Buddha Soul pieces.  Kelly Ripa, Eve Longoria and Beyonce Knowles are also big fans.  Their amber serenity necklace is shown above right.

It's terribly fun to make jewelry on par with a "Stylist to the Stars," don't you think?  (Bead World's leaf chain sample is show at left.)  Check it out, and see if you think our earrings compare!  I'd love to hear what y'all have done with this gorgeous chain!

Thursday, March 4, 2010

PMC -- What the Heck Is It?

As the first bead store in the Phoenix area to teach Precious Metal Clay classes, we hear a lot of questions about this remarkable material.  "How do you work with it?"  "What can you so with it?"  "What the heck is it?"  Precious Metal Clay (or PMC, as it is more commonly called) is a mixture of .999 silver ground up into a very fine dust, water and and organic binder. It has a texture similar to polymer clay and can be molded, shaped, rolled out, stamped and cut with cookie cutters. When fired in a kiln, all that's left is the solid fused .999 silver.  What this means to a crafter is the ability to make custom silver charms, pendants, findings and more without having to learn silversmithing skills.  Many items that are time consuming and difficult to create using traditional methods are a snap with PMC.  It's so fun designing unique silver elements that it becomes an addiction!

PMC comes in a variety of formulas. They vary in firing time, firing temperature, workability and finished strength. Choosing the right PMC formula for a given project is very important, so we strongly recommend taking a beginner's class to help you get started.  If you live in the Valley of the Sun, I know some great bead shops that teach PMC classes!  Bead World markets PMC in several ways. Of course, we teach PMC classes and sell PMC products, tools and supplies. We rent kiln time and workshop time to clients who have not yet invested in their own full home studio. We also sell several beautiful books on PMC.  If you don't live in the Phoenix area, PMC and PMC supplies are available through many bead stores throughout the country and in online stores.

If the idea of creating custom silver pieces is appealing to you, check out PMC and all you can create with it.  You'll be so glad you did!

Monday, March 1, 2010

Think Outside of the Box!

This fun little bracelet was created by Frongelyn Booker at our Phoenix store.  It highlights a number of non-traditional elements in a very sophisticated, cohesive way.  The large double-drilled pietersite sets the rich, organic color pallet for the piece.  Small faceted garnet rondelles bring in some light and sparkle.  The metals used in this bracelet, Vintaj antiqued brass and copper, are a perfect compliment to the gemstones.
Frongelyn did two particularly interesting things with this piece.  First, she used a single strand toggle with a two stranded bracelet.  Contrary to popular, this is a completely reasonable thing to do!  You just need to be certain that the last few beads on the toggle bar end can fit through the toggle ring opening.  Secondly, she used small copper jump rings as a spacer!  This bracelet looks great, and shows that you can do amazing things when you think outside of the box!

Thursday, February 25, 2010

Put the Pretties Front and Center!

Put the Pretties Front and Center!

There are few things I love in this world more than a beautiful, substantial toggle, but I hate wasting all of that silvery goodness at the back of my neck.  No matter how much I love a clasp, there's no sense paying for something that people may never even see.  What's a girl to do?  I say...put the toggle in the front of the necklace!  When you use a high end designer clasp, it can be the most stunning element of your entire piece.   (The toggle shown above left currently retails at Bead World for $16.50.)

Once you get used to the idea of  placing a toggle at the front of a piece, it opens up a whole new world of engineering options.  A toggle is a great place to anchor a pendant or large gemstone.  In the piece shown at right, turquoise and a pearl were wire wrapped onto a sleek, modern toggle.  This creates a "Y" neckline while maintaining the necklace's clean lines. 

You can wire wrap on any number of different decorative elements.  You can even add a cascade of mutiple dangles and drops.  In the necklace shown at left, three dangles shimmy down from the center toggle.  Each dangle is composed of multiple elements from the main necklace, and they are individually wire wrapped together.  It's an expensive, elegant look, but take note: it's made up entirely of leftovers that the designer had on hand! 

Have fun with big toggles and don't let them scare you.  Once you start experimenting, you'll see how much fun they can be!  I can't wait to see the gorgeous ideas y'all come up with!